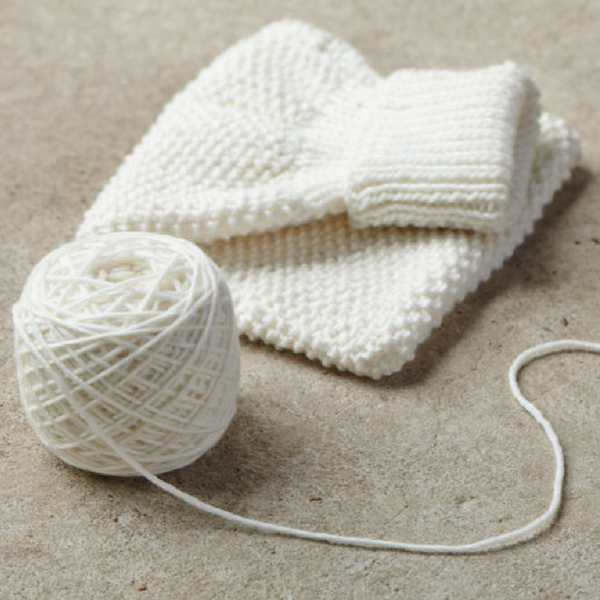
Hottie.
Q:What do you do with a hot water bottle cover when it’s not cold outside?
A: Use it as a Santa Sack & fill it with all the festive season cheer you can find. This moss stitch Santa sack / hottie cover is an easy knit, perfect for decorating & gift giving. And when it gets cold again, you can slip a hottie in and, well, not be cold anymore. It’s the gift that keeps on giving!

Materials
208 metres / 228 yards
DK weight (8 ply) yarn
Gauge
10x10cm / 4x4inch square moss stitch = 18 stitches x 24 rows after blocking
Needles
Straight or 16-inch circular needles in size 8US (5mm)
Finished Dimensions
BODY
26.5x21.5cm / 10.5x8.5inch
NECK
15x18cm / 6x7inch
This cover fits a regular 2-litre hot water bottle.
Tools
Blunt tapestry needle
Techniques
Elizabeth Zimmerman Sewn Bind Off: an extremely stretchy bind off that resembles the long tail cast on in appearance.
Knit (k): with working yarn in back, the right needle is inserted into the front loop of the next stitch on the left needle from front to back. Yarn is then wrapped anti-clockwise around the tip of the right needle and pulled through to create a new stitch.
Knit 2 Together (k2tog): knit two stitches together as though they were one, decreasing one stitch.
Left Lifted Purlwise Increase (LLPI): purl the next stitch as usual, insert the tip of your left needle into the stitch below the one you just worked (the second stitch down), lift that stitch up onto your left needle and purl it, increasing one stitch.
Long-Tail Cast On: a stretchy and versatile cast on that is started with a long tail of yarn. The length of yarn needed is 3-4 times the length of your cast on edge; for example, for a bottom up hat, you will need 3-4 times the head circumference to allow enough yarn for your cast on.
Mattress Stitch: an invisible seaming method used mostly for seaming along vertical edges. Using a tapestry needle pick up the horizontal bars of yarn running from the edge stitch to the main work, going back and forth between the two pieces to be seamed, pull firmly after ten or so stitches to close the gap between the work.
Purl (p): with working yarn in front, the right needle is inserted into the front loop of the next stitch on the left needle from back to front, Yarn is then wrapped anti-clockwise around the tip of the right needle and pulled through to create a new stitch.
Right Lifted Purlwise Increase (RLPI): insert the tip of your right needle into the stitch below the next stitch on your left needle, bring that stitch up and place it onto the left needle, purl into the lifted stitch, purl the working stitch, increasing one stitch.
Slip, Slip, Knit (ssk): slip two stitches, one at a time, onto the right needle. Insert the left needle into the front of the two stitches and knit through both of them, decreasing one stitch.
Ribbed Neck
Using the long-tail cast on method, CO 26st (if you ensure you have at least 51cm / 20inch of tail yarn after completing your cast on, you can use this yarn to mattress stitch one side closed at the end without having to weave in another length of yarn.)
Row 1 (WS): k1, [p1, k1] 12 times, k1
Row 2 (RS): k1, [k1, p1] 12 times, k1
Repeat rows 1 & 2 until ribbing measures 18cm / 7inch from CO ending on a RS row.
Moss Stitch Body
Increase Row (WS): k1, [RLPI, p1] 5 times, p, [p1, LLPI] 5 times, k2 (36 stitches)
Row 1 (RS): k to end
Row 2: Slip 1 with yarn in front, *p1, k1, repeat from * to last stitch, p1.
Row 3: Slip 1 with yarn in back, *k1, p1, repeat from * to last stitch, k1.
Repeat Rows 2 and 3 until piece measures 74cm / 29inch from the cast on edge, ending with Row 3.
Decrease Row (RS): k3, [ssk, k1] 5 times, k1, [k2tog, k1] 5 times, k2 (26 stitches).
Ribbed Neck
Row 1 (WS): k1, [p1, k1] 12 times, k1
Row 2 (RS): k1, [k1, p1] 12 times, k1
Repeat rows 1 & 2 until ribbing measures 18cm / 7inch ending on a WS row
Bind off using Elizabeth Zimmerman’s Sewn Bind-Off
Finishing
Sew the side seams together using mattress stitch - as the top cuff is to be folded over it is a good idea to start with the rib and mattress stitch from the wrong side, once you reach the stockinette, bring your needle through to the right side and continue to mattress stitch down until you reach the end (the middle point of colour 2), repeat for the other side and then weave in the ends.
Well done, you've just made a cosy cover for your hot water bottle.

0 comments